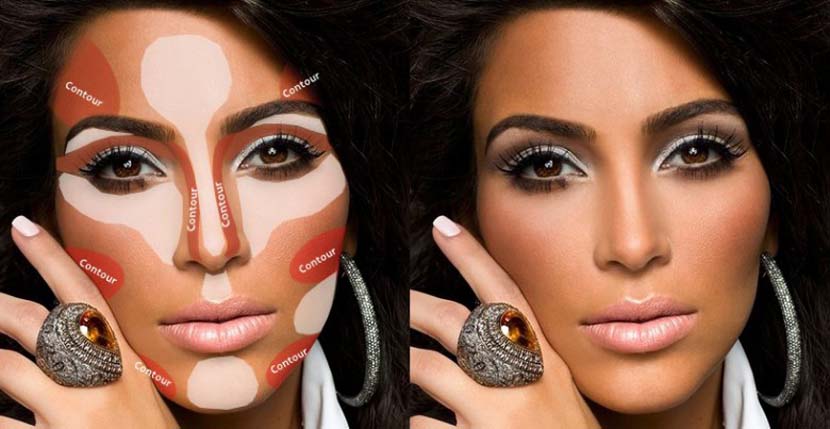
Define the contour of the face and highlighting the features is a great tool when it comes to the makeup for a special occasion. The definition of the contour of the face is ideal for people who need to improve it or do not have too prominent features.
Above all, it is important to use quality products, because only these ensure a correct duration and result. Good products can make a big difference when it comes to the makeupThese have the right texture to blur and achieve the desired definition.
To achieve this more defined makeup, you have to start with a clean, hydrated and perfectly prepared face.
Step 1:
After applying the primer, apply the foundation to your skin tone using a thick brush.
Wipe it over the bridge of the nose, chin, and lower eye area. Most makeup artists, to illuminate the face, apply the product in the shape of an inverted triangle, going from the sides of the nose to the temples and from these to the cheeks.
The idea is to highlight the areas that would naturally be illuminated.
Step 2:
Now is the time to use a foundation for the contour of a dark shade. Apply using a brush below the cheekbones, the jaw, along the sides of the nose, and in the outer corner of the eye area towards the temples, in order to sculpt the face correctly.
Step 3:
The next step is to mix all the colors, for this you need a thick brush and blur the tones using circular movements.
Through this trick, the skin will take on a perfect appearance and the lights and shadows will appear more subdued, but with the definition still visible.
Once the colors have blended harmoniously it is time to apply loose powder to seal in the makeup.
Retouching
To dull the colors, just apply with a finer brush, a lighter colored loose powder under the eye area, the forehead (between the eyebrows and up) and in the chin area. Near where the light makeup powder has been applied, you need to sprinkle a little bronzer powder, just to outline the face and emphasize the bone structure.
The excess is removed with a clean brush.
I leave you a very good and complete video tutorial!
https://www.youtube.com/watch?v=_dLSy75M46o#t=14